Thursday, February 25, 2010

Button Crazy!


I've been called button crazy a couple of times now. Now that I'm working alone, I guess I'll call myself it. It is justified. I'm button crazy. Hundreds of buttons and more and more- it makes you crazy... every step, you do over and over again. Thank goodness pottery teaches you patience, because you need it when working a project as tedious as buttons. This batch is my fourth large endeavor, and I'm sure Mary from Fat Cat Pottery (see below) is smiling when she's reading this because she won't have to deal with them in the kiln.


In this batch, I'm expanding my shapes to include
square, heart and stars. I'm also experimenting with new stamps and Speedball underglazes that I got as a gift. I'm not too sure about the blending they claim to be able to do- I tried to make a dark brown and ended up with grey.


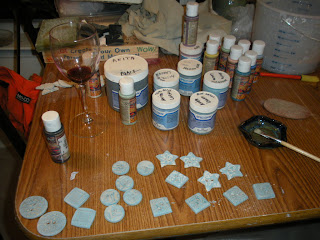
Buttons and magnets are great for experiments; textures, underglazes, stains and glazes- as long as you have the patience!


So, the fourth batch of buttons is done- now I need to get busy working on smaller ones! The projects and the experimenting never end!

More about Fat Cat Pottery...
Before Moving to TN, I was working out of Fat Cat Pottery in Wilmington, NC. I miss that studio so much! Mary the owner, and her husband Sonny are two fantastic people. Mary is a fabulous potter, with a wealth of knowledge that she was so willing to share with others- Thank you Mary! The other members of the studio were always there to inspire, share ideas with and talk about life. I made some wonderful life-long friends there- I can't wait to go back and visit!


Mugs!


Here's some photos of mugs that I made a little while ago. I missed documenting the throwing and trimming process, but I did take a couple shots of the mugs pre-handle and post-handle.
Pull those handles! The "cow tongues" as my husband call them are hanging off the table to dry a little bit- so they're not so sticky to the touch before I attach them to the mugs. I know you can pull handles right off the mug, but I like the final look of my method better- so far. We'll see, as time changes so do handles. When I first started taking pottery classes I couldn't pull a handle for the life of me. After coming back to pottery after a year off, I decided to try and pull a handle- and somehow I could! Ta-da!
If you're wondering why some of the handles look like they're different clay- well they probably are. I use so many different types of clay, the one one I can keep separate is the porcelain. So, mugs often have different types of clay on for handles, etc. Sometimes this looks great after it's glazed, and other times you can't even tell that it's a different type of clay. But you'll never know until you try!

More studio details


I know I have some catching up to do, so here's some more pictures of the dining room setup. Here's my fancy slightly melted wheel, a brent c- love it. In case you're wondering what that mirror is doing behind it- it's great for checking the shape of our pot without straining your neck every two seconds, it helps to find a wobble and it makes finding your needle tool that slipped under the splash pan way easier.


Here is a photo of the wedging/storage table my sweet husband made for me. It's canvas on top, with wheels for easy cleaning, has hooks for the dustpan and tools, a shelf to hold heavy drywall, clay, bats and tools and even a wire for easy cutting. It's great that with a little heave-ho I can move all that clay and drywall weight with ease!


Here's a close up of work on an old bread rack that was sanded and painted (thanks again to my handy husband). It was given to my father, who had saved it from being thrown away. We cut plywood to make shelves and it works great! I have two of these- this one is open and great for drying/storing work. The other was half made into a damp box- with a little velcro and plastic. Having a damp box saves so much time! When I'm done I just slide the shelves of work in and close it up!

Wednesday, February 24, 2010

The home studio...


... I mean a converted dining room. It's okay though. Thanks to an ad on Craigslist I was able to find and purchase an entire studio from someone who couldn't find the time. I'll find the time! I was able to get a wheel (which was slightly melted, but it adds character- and it works great), a kiln, tools, a griffin grip, a ton of chemicals and random stuff in-between.
So.....
Scoot over the table; my loving husband created a wedging table out of scrap wood, he also sanded and painted some racks my Dad donated to me- and BOOM! I have a studio! It works! I put thick plastic down to keep the clay off the fancy walls and floor. An air filter runs to keep the dust down. Since I don't have access to a sink with a trap on it to separate the clay, I've been using that handy grey bucket to wash off my tools and hands after each use. It works for now! Better to be in the clay then be dreaming about it!