Thursday, March 24, 2011

Kiln Opening!

I can't believe it's almost been an entire year since my last post. 2010 was a crazy year, I've never travelled so much in my entire life. It's good to be back and closer to my Pottery Empire- let the pottery crazy begin!
Speaking of crazy...
This little guy will soon be my new kiln god, as soon as he's fired and glazed he'll make his home watching over the kiln. I know it's crazy, but I think it's a pre-req to be a potter.
He's cute.

This is the kiln he'll be watching over- so far I've been super lucky and the firings have gone smoothly (knock on wood)... but a little funny looking kiln god is always good to have. The very last step in making ceramics is the most anticipated.

Opening a glaze kiln for the first time is like looking under the christmas tree when you're 5 years old- it doesn't get any better then this... let me show you.
I unloaded this kiln last week. The picture above shows the kiln when it is still too hot to open (195 degrees F), yet I couldn't stay away.
The last 300 degrees cooling takes F O R E V E R.
Of course, peeking at the top shelf is always a special treat and a little preview when it's below 400.
As soon as that baby gets around 100 degrees F, it's time for the big reveal and unload! Ta-Da!


This is what the top shelf looked like... beautiful!


The next shelf down has more surprises...


The third layer down....


The fourth layer...


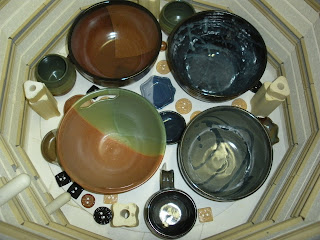
And lastly, the bottom of the kiln...


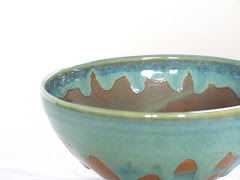
Next, it's time to take a closer look at all the new treasures... beautiful marbleized clay (porcelain, speckled brown stoneware and dark brown stoneware), glazed in clear...

When it's all laid out on the table, it's a beautiful sight... finished work!
Berry bowls galore!
Opening a glaze kiln is always a surprise- after days and days of hard work- it all pays off!

Some of this work can be found at potteryhead.etsy.com
The rest of it will be at my next show; Arts in the Park in Richmond, VA April 30th-May 1st.


Saturday, April 10, 2010

Introducing the Pottery Empire!

I know, it's been a long time since my last post- but
I had a good reason....
I moved across town. After packing, moving, working and unpacking- today was the first day I've been in my "studio" again in a long while- and it was AMAZING. It's almost like you forget how great it is until you're back at it. I'm happy to be back at it- in my POTTERY EMPIRE.

A few weeks back, our lease was up- so we were mainly looking for a place to live that would better suit pottery (ie. the kiln).... at our previous place, I was talking my greenware to another studio to be bisqued, glazed and fired. Although I had a kiln, it was mainly just a conversation piece with the neighbors. The electricians wanted way too much to put in a new outlet- when we might have been moving anyway- which brings us to the new place.

After two weeks of heavy searching and looking at some real shitholes, we drove past a place with a for rent sign in the yard (this is the absolute best way of finding a place to rent, even with our ever-growing advertisements- 2/3 past place were found this way). And then we found it... an entire downstairs- which becomes my Pottery Empire, a place to hook up the kiln,

a fenced in yard, an above ground pool and it was cheaper then before. AMAZING. And... here in is the Empire- a few weeks later and 95% unpacked....
I have a lot of room to create and a room for finished product/packing for shipping/shows.


I have a great view of the pool from
my wheel. I can't wait to open it for the season!


And the first thing to be made in the Empire....


these are tiles for glaze tests.
Since I'll be making all my glazes from raw chemicals, I'll need to test tiles to try each glaze on- before I commit 20 mugs to a certain color/color combo. I threw rings of text tiles in each type of clay I use. P-5 Highwater Porcelain, 112 Brown Stoneware from Standard Clay and 266 Dark Brown Stoneware from Standard Clay- this is my favorite- it will stain your clothes and make a glaze look super rich. After throwing the rings, I labeled what type of clay was used, as well as number for later referencein my glaze notes.
Next, I chopped apart the tiles

and set them under a towel for even drying.
After the tiles were complete, I made some berry bowls- the back stairs right outside the garage and right by the pool make a great location for drying pots quick in the sun.
I am so happy and lucky to
have my Pottery Empire!

Thursday, February 25, 2010

Button Crazy!


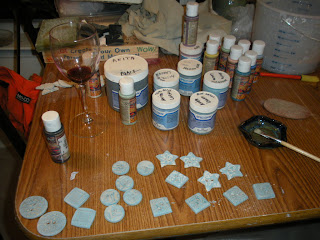
I've been called button crazy a couple of times now. Now that I'm working alone, I guess I'll call myself it. It is justified. I'm button crazy. Hundreds of buttons and more and more- it makes you crazy... every step, you do over and over again. Thank goodness pottery teaches you patience, because you need it when working a project as tedious as buttons. This batch is my fourth large endeavor, and I'm sure Mary from Fat Cat Pottery (see below) is smiling when she's reading this because she won't have to deal with them in the kiln.


In this batch, I'm expanding my shapes to include
square, heart and stars. I'm also experimenting with new stamps and Speedball underglazes that I got as a gift. I'm not too sure about the blending they claim to be able to do- I tried to make a dark brown and ended up with grey.


Buttons and magnets are great for experiments; textures, underglazes, stains and glazes- as long as you have the patience!


So, the fourth batch of buttons is done- now I need to get busy working on smaller ones! The projects and the experimenting never end!

More about Fat Cat Pottery...
Before Moving to TN, I was working out of Fat Cat Pottery in Wilmington, NC. I miss that studio so much! Mary the owner, and her husband Sonny are two fantastic people. Mary is a fabulous potter, with a wealth of knowledge that she was so willing to share with others- Thank you Mary! The other members of the studio were always there to inspire, share ideas with and talk about life. I made some wonderful life-long friends there- I can't wait to go back and visit!


Mugs!


Here's some photos of mugs that I made a little while ago. I missed documenting the throwing and trimming process, but I did take a couple shots of the mugs pre-handle and post-handle.
Pull those handles! The "cow tongues" as my husband call them are hanging off the table to dry a little bit- so they're not so sticky to the touch before I attach them to the mugs. I know you can pull handles right off the mug, but I like the final look of my method better- so far. We'll see, as time changes so do handles. When I first started taking pottery classes I couldn't pull a handle for the life of me. After coming back to pottery after a year off, I decided to try and pull a handle- and somehow I could! Ta-da!
If you're wondering why some of the handles look like they're different clay- well they probably are. I use so many different types of clay, the one one I can keep separate is the porcelain. So, mugs often have different types of clay on for handles, etc. Sometimes this looks great after it's glazed, and other times you can't even tell that it's a different type of clay. But you'll never know until you try!

More studio details


I know I have some catching up to do, so here's some more pictures of the dining room setup. Here's my fancy slightly melted wheel, a brent c- love it. In case you're wondering what that mirror is doing behind it- it's great for checking the shape of our pot without straining your neck every two seconds, it helps to find a wobble and it makes finding your needle tool that slipped under the splash pan way easier.


Here is a photo of the wedging/storage table my sweet husband made for me. It's canvas on top, with wheels for easy cleaning, has hooks for the dustpan and tools, a shelf to hold heavy drywall, clay, bats and tools and even a wire for easy cutting. It's great that with a little heave-ho I can move all that clay and drywall weight with ease!


Here's a close up of work on an old bread rack that was sanded and painted (thanks again to my handy husband). It was given to my father, who had saved it from being thrown away. We cut plywood to make shelves and it works great! I have two of these- this one is open and great for drying/storing work. The other was half made into a damp box- with a little velcro and plastic. Having a damp box saves so much time! When I'm done I just slide the shelves of work in and close it up!

Wednesday, February 24, 2010

The home studio...


... I mean a converted dining room. It's okay though. Thanks to an ad on Craigslist I was able to find and purchase an entire studio from someone who couldn't find the time. I'll find the time! I was able to get a wheel (which was slightly melted, but it adds character- and it works great), a kiln, tools, a griffin grip, a ton of chemicals and random stuff in-between.
So.....
Scoot over the table; my loving husband created a wedging table out of scrap wood, he also sanded and painted some racks my Dad donated to me- and BOOM! I have a studio! It works! I put thick plastic down to keep the clay off the fancy walls and floor. An air filter runs to keep the dust down. Since I don't have access to a sink with a trap on it to separate the clay, I've been using that handy grey bucket to wash off my tools and hands after each use. It works for now! Better to be in the clay then be dreaming about it!

Tuesday, November 24, 2009

Here we go

So this is the beginning. I'm getting things set up.